- Reporter walks up to the barn and looks around, finds stairs and goes up to the room.
- Once in the room, reporter looks around, lights a candle and going through the filing cabinet. Walks over to jewelry boxs and shuts it. As the box shuts, the locked draw in the filing cabinet opens with a scary doll inside- laughing and holding the scrapbook.
Thursday, 18 December 2014
Production Meeting #3
In our third production meeting, we came up with a walkthroughlist for our filming. This is only a rough list as we still had other ideas in mind:
Sunday, 14 December 2014
Production Meeting #2
In our second production meeting, we focused around our scrapbook idea. We came up with a list of photo's and newspaper articles we want in out book:
- Old Dates
- 'MISSING' 'DEAD' reports
- Paranormal sightings
- Old photographs
- Child based
- Abnormal acting
Our list is mainly based on things that may make the audience think our opening sequence will lead to a mysterious twist, as missing reports and child based things are seen as very sinister and creepy.
We have also found a location for our filming- a converted barn at Hinskey Golf Club- Oxford. We thought this would be a perfect location as it is very quiet and innocent. We have decided that the main character will be a report detective who will be checking out the location.
We have planned our next production meeting to be based on a storyboard/scene list. In the meantime, we will be in the process of making the creepy scrapbook.
Saturday, 13 December 2014
Production Meeting #1
For our first production meeting, we really reconsidered our idea for our opening sequence. It is great to say that we came up with a brand new idea that we all agreed on. Our opening sequence is now going to be based around an old scrapbook that is filled with creepy news articles, and then the girl looking through it hears a noise.
Once we all understood, we then focused on location. We agreed on a perfect location (one of the group member's dad's workshop) which is an office room filled with file cabinets and antiques. We thought this would be good as it matches the creepy vibe.
For the first meeting, we agreed on a lot of things, and one of my tasks is to make the creepy scrapbook. Below are a few images to help you see the theme we want.
Time Management
After our first production meeting, we created a time management plan to follow so we can keep on track. This will help us meet individual deadlinesaWe have spread out Pre-production, production and post-production to give us plenty of time to go through with our productions and enough time at the end to review our work and tweek it to perfection. Below is the plan we created:
 As you can see on the plan, we have given ourselves, in total, 7 weeks for our pre-production, and 3 weeks for our actual production. We have done this as preproduction and filming do not take as long as our post production will, therefore we have left ourselves a total of 12 weeks for editing and post production.
Saturday, 6 December 2014
Pitch
Last lesson, we presented our opening sequence pitch to the class. We got a lot of great feedback and suggestions. We have decided that we are definatley going to do a horror genre, however our idea of a girl being chased through the woods is not going forward ad our feedback said that that is a 'very common' scene for a horror film. We want to make it individual, therefore our our first pre-production meeting will be based on our induviduality being presented in our film. To see our pitch, click here!
Wednesday, 12 November 2014
Horror Opening Sequences
For my main task, I have decided to use the horror genre. I have been researching horror opening sequences to get some sort of idea on how to do mine. I have watched many sequences, however I have focused on three main ones.
1. The Conjuring- James Wan
The opening sequence of The Conjuring links very well with the horror genre. The soundtrack is very slow paced and quite creepy, which links to the several newspaper articles you can see. This all helps reinforce the fact that it is based on a true story. The editor and directors names are drawn into the articles, making them seem for involved in the film. Many of the articles have family pictures, mainly with children, giving the opening sequence have an innocent touchm creating an even more creepier, scary sense.
2. The Cabin in the Woods- Drew Goddard
The opening sequence of The Cabin in the Woods is a lot less 'creepy' than that of The Conjuring, however the Cabin in the Wooods is more on the ditrubing side with the images of sacrafice. These images give it a more historical feel, adding to the realistics. As the titles finish, it goes into what seems to be a normal teenage life, this adds tension as you don't know what is going to happen to the starting characters.
3. Evil Dead- Fede Alvares
http://www.artofthetitle.com/title/evil-dead/
The opening sequence of Evil Dead is very similar to The Cabin in the Woods as it has similar images of blood and torture. The soundtrack is very well linked to the 'evil' theme as it sounds like maybe a Gospel Choir, which shows the satanic vs God theme. Overall this opening sequence relates well to genre. The titles are all in block font and red which links to the dark, bloody theme.
Tuesday, 11 November 2014
Product Research
For my Main Task product research, I have been researching opening sequences of films and have compared three different sequences. I have found some similarities and differences between all three:
- Dinner For Schmucks- by Jay Roach
- The font used for the titles is very 'inoccent' looking, matching the soft soundtrack by The Beatles and the 'innocent' mice, However, this adds a twist as the mice are real, stuffed mice, which does not seem 'sweet and innocent' but instead fairly weird.
- Even though the soundtrack is soft, the lyrics talk about a lonely man with 'his head in the clouds', which links to what we can see, a man arranging stuffed mice and ironing tiny clothes for them. This gives us a little bit more insight into the character , and he may be lonely or a bit of an outsider.
- The producers names are seen atthe end of the sequence, in bigger font than the actors. These names are all spread out across the screen, same as the actors, however, at the very end, the directors name is in bigger letters in the middle of the shot.
- The font is very narrow and in a white colour, which links to the 'sweet and innocent' feel, but also not shouty about the names.
A link to this opening sequence can be seen here:
2. Catch Me If You Can- by Stephen Spielberg
- The titles were linked into the opening sequence, seeming as if it was part of it. This draws the audience into seeing the names. This differs from Dinner for Schmucks as it is very shouty.
- The soundtrack flows well with the font speed and the short animation clip we see. The music is very mysterious, as is the animation.
- The animation has a story line, which you assume to be the story line of the film, differing to Dinner for Schmucks again as that does not give you a massive insight into the films storyline.
- The director and producers of the film are seen at the start of the seuqnece rather than the end. Stephen Spielberg's name is seen three times; start, middle and end to be shouty The actors names are only a little bit smaller, still eye catching.
A link to this opening sequence can be seen here:
3. Coraline- by Henry Selick
- The actors names are seen at the start, before the animations start, which differs from the two above sequences. The animators and producers names are the same size font as the actors, and they are not very shouty like Catch Me If You Can's font.
- The music is a by The Children's Choir of Nice, accompanied by Orchestra which gives the whole sequence a 'creepy' sence, linking to the animation of the doll being torn apart and turned inside out.
- Henry Selick's name is the last name on the screen, similar to all three opening.
A link to this opening sequence can be seen here:
Saturday, 8 November 2014
Main Task- The Brief
The Main Task
The Brief-
The Brief-
"Film the opening sequence of a new fiction film, including
titles, and soundtracks to last approximately two minutes"
As you can see, I have highlighted 5 main points in this brief, to show the most important aspects I will need to focus on during my task. Leading up to my pre-production, I will be thoroughly researching these aspects to understand them, gather ideas and compare film opening sequences. I will start off my research by looking at 'titles' within opening sequences which further posts will show.
Friday, 31 October 2014
Match on Action
Match on Action is a very common use of film editing. It shows a different view of the same action at the same time (if edited correctly). For example: a close up of someone holding the door handle, and then a shot of the door handle moving from the other side of the door, and then a shot of the character walking through the door, shows the same action, but from each side of the door. It is not a realistic view for one individual, however, strangely enough, it looks more real than just one view!

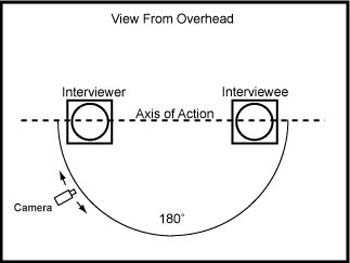
180 Degree Rule
The 180 Degree rule is the most important part when filming dialogue. It acts with the shot/reverse shot and helps the continuity of the shot. The 180 Degree rule means that when you shot one character and they are positioned on the left of the screen, your reverse shot needs to be the same. This means that the other character in the reverse shot needs to be on the left of the screen as well. This makes it seem as if the two characters are opposite each other rather than next to each other. While filming the 180 Degree Rule, you need to have an imaginary line on the floor in which you cannot cross, this is known as the axis of action. If you cross this, you brake the rule. This diagram should help understanding:
Thursday, 30 October 2014
Prelimary Task- Final piece
This is my final piece from my prelimary task. We used lots of editing skills to make this film continuous, however at 0.13 it was not the best. You could see the visible editing where it should have been invisible. If we took a little more care in our camera positioning I think it would have made it more continuous. For a first attempt of editing together film clips, I think this went fairly well.
To see this piece, click here:
To see this piece, click here:
Friday, 24 October 2014
Preliminary Task
In the previous lesson, we were given a preliminary task to complete, which was:
 Two following posts will be uploaded, linking to this, to explain Match on Action and the 180 Degree Rule.
"Continuity task involving filming and editing a character opening a door, crossing a room, sitting down in a chair opposite another character, with whom she/he then exchanges a couple of lines of dialogue. This task should demonstrate: match on action, shot/reverse shot and the 180 degree rule."Before anything, we had to plan. So this is the storyboard my group will be following:
Friday, 17 October 2014
Editing
In a lesson, we have focused on editing. We have been given lots of key terms to learn to show our understanding of the editing process.
Cut: The most basic and common type of transition is the cut. It is mainly used when one shot replaces another, instantly. The main reason for a cut is to make sure the film runs smoothly while the audience still understands and interprets the scene correctly. Cut is also essential for Juxtaposition (two things being seen or placed close together with contrasting effect.)
Main uses involve:
- Change scene
- Compress time
- Vary the point of view
- Montage, build up on image/idea
Match Cut: The match cut is the basis for continuity editing. Editors use this cut to suggest a relationship between two different objects or to create a 'visual metaphor'.It can be two different objects, different spaces or two different compsoitions that graphically match.
Main uses involve:
- Continuity of direction
- Completed action
- A similar centre of attention in the frame
- A one-step change of shot size (long to medium)
- A change in angle
Jump Cut: The jump cut is a type of cut that includes two sequential shots of the same object but the camera arrangement only varies slightly. This cut gives the impression of going forward in time.
Motivated Cut: The motivated cut is used to connect two scenes: the subject searching for something of interest and the object of interest. It is often used to show the two objects far apart.
Cutting Rate: The cutting rate of a film included how many cuts are used within a certain amount of time. For example, you will find that action scenes have a higher cutting rate than romance films because there is more action to match the rate with.
Cutting Rhythm: The cutting rhythm is used to create a sense. For example the rythm may be slowed down to create tension and drama.
Cross Cut: The cross cut is often used to show action in more than one location. The camera will cut away from one scene of action to the other, sometimes suggesting simultaneity.
Cutaway: A cutaway is an interuption of continuous camera action, by a view of something else. It usually is followed by a cut back to the first shot.
Reaction Shot: The reaction shot is a shot used to cut away from the main scene to show a reaction of the characters involved.
Fade/Dissolve: The fade transition is a gradual fade from the main picture, normally to either a black screen or a solid colour. The dissolve transition is when one picture is gradually overlapping the other picture.
Friday, 10 October 2014
Sound Research, war soundtrack
In a lesson, working in partners, we had to proudce a short soundtrack representing World War 1. Me and my partner, Amy, created some of our own sounds and used sounds off of SoundBible to recreate the scene. We then edited our audio on MovieXPlus 6 to make it flow. Creating our own sound (Foley Sound) was difficult as it was hard to create an exact sound, however, it was interesting what objects could make such hard sounds! We recreated the start of the track by standing in muddy water and gravel in welly boots to act out walking in the trenches. The grenade fading and stormy weather helped realise the environment at war. Dialogue was also used to show pain and emotion within soldiers.
The final piece is on Amy's blog as I could not upload due to technical problems with MovieXPlus.
This is the link to our final piece:
http://amysimpsonmediastudies.blogspot.co.uk/2014/10/war-soundtrack.html
The final piece is on Amy's blog as I could not upload due to technical problems with MovieXPlus.
This is the link to our final piece:
http://amysimpsonmediastudies.blogspot.co.uk/2014/10/war-soundtrack.html
Thursday, 25 September 2014
Sound Research
I have recently started to work on sound in film and I have learned a lot about how sound can make or break potential film pieces. Survey's show that 70% of film viewers watch a film at the cinema because of it's sound. Sound is a key feature to film, as it helps tell the story, makes the shots interesting, and makes it real for the audience. Even when the silent movies came out, there was still Non-Diegetic sound (background music) to make it more interesting.
The types of sound I have been focusing on are non-Diegetic and Diegetic.
The types of sound I have been focusing on are non-Diegetic and Diegetic.
Diegetic
Diegetic sound is sound that we as audience AND the actors could hear. This includes things such as dialogue, footsteps, music on the radio and background noise on set. Even though these sounds seem real, it is very interesting to know that all of these sound effects are in fact Foyle sounds (Added on after shooting).
Non-Diegetic
Non-Diegetic sound is the sound we as the audience hear, however the actors on set don't. For example, background music and Voice Over help explain the scene to the audience. However, nobody on set knows anything about it.
The scene I focused on for my research was taken from James Bond's Casino Royale, Click the video clip to watch the scene.
Wednesday, 24 September 2014
Short Clip- Camera Shots in practice
In a lesson, we were given a small brief telling us to make a short clip of camera shots, without audio, showing one person giving another some bad news. We had to do this by showing emotion through camera shots. We decided to use lego men for this so we could get the right emotion. We used a variety of camera shots, for example:
- An establishing shot- this sets the scene
- Reverse shot- this shows that the lego men are having a conversation, flicking between characters. This also includes the 180 degree rule.
- Wide shot- this shows the characters within the surrounding, still showing they are talking.
- A close up on the face, showing tension and worry from the build up.
- A high angle shot, showing the other character is 'pregnant' (bad news), also still showing her happy emotion.
- A close up on the face- showing panic and fear from the bad news.
- High andgle shot- used to show the powerless character, dropping his cup in shock.
- Another wide shot- used to show the character falling over, in shock, compared to the surroundings.
- Two ariel shots are used to exaggerate the shock, and the problem, one without the other character, and then one with the other character.
- An eye level shot- used to show the 'evil' emotion on the characters face, looking upon the shoked character.
- A reverse shot- used to show the character walking away, emphasising the point of her'not caring' and leaving him.
We found it fairly difficult to put the shots together and make it run freely, so it does look a bit more like a slideshow then a film.
https://www.youtube.com/watch?v=oGD8BgksQ-o
Tuesday, 23 September 2014
Lego Movie Planning
Our brief for the short clip is to create a clip of one character giving the other character bad news, not including any audio, just focusing on camera shots and angles. As we can not include any dialogue, it makes us focus more on expressions, angles and shots and how important they are to the film. This is our storyboard:


Monday, 22 September 2014
Camera shots- Fast and Furious 6 scene
Continuing on from my previous post on camera shots, I have analysed a scene from 'Fast and Furious 6' to demonstrate camera shots in films. I have found lots of different camera shots during the scene and have recognised the meanings and purposes of them.
- At the very start of the scene, there is a quick establishing shot. This is used to allow the audience to understand the setting.
- After that, there are lots of reverse angle shots, showing what the people are seeing in the scene, and reinforces the speed of the cars.
- Close ups are used on peoples faces to show emotion and feelings and used on actions to show intensity of the chase such as gear changes or exhausts.
- Eye Level shots are used to draw the audience in and make it feel real for them- as if they are there.
- Big close ups are used on props from intensity such as cables tightening to trap the tank.
- Reverse angle shots on the tank flipping. This shows destruction and action.
- Medium long shots/ long shots are also used to show the vast destrucion and acion packed setting.
- High and Low angle shots are used to show the vast scale of destruction.
- A birds eye few or aerial shot is used also to show the intensity of destruction by showing the height of the blast.
- Another establishing shot is used to show the audience the setting in destruction.
- Eye level shots are used again to make the audience feel as if the action is coming towards them.
To watch the clip, click the video clip.
Wednesday, 10 September 2014
Camera Shots
I have created a power point presentation to show the different methods of camera shots used in the film industry.
I have explained how and why these shots work, including the meanings they imply to the audience. All of these shots are recognised. However, the majority of the audience do not understand the reasons why the producer has used the shot.
The whole purpose of camera shots is to draw the audience in, and help them use their imagination.
Below is a link to the PowerPoint presentation that you will be able to view in a separate window.
Subscribe to:
Posts (Atom)